To purchase a site key for the Apptivo Business Site plugin, start off by creating an Apptivo account. Once you have created your Apptivo account, you’ll need to log in and access the WordPress Business Site App. If this app isn’t available on your list of applications, use the “App Store” link at the top of the page, and find … Continue reading
Posts Tagged: website management
Demo of Sites App for eCommerce and Content Management Systems
How do I add jobs to my website’s careers section?

Apptivo is one stop solution for managing a professional looking business website. Most business websites nowadays have a Careers section, and display the various open positions in this section of the website. To add or edit the job openings on your website please follow these steps. Login into your Apptivo account. Your account should have access to the Human Resources … Continue reading
How do I edit the Products on my eCommerce website?
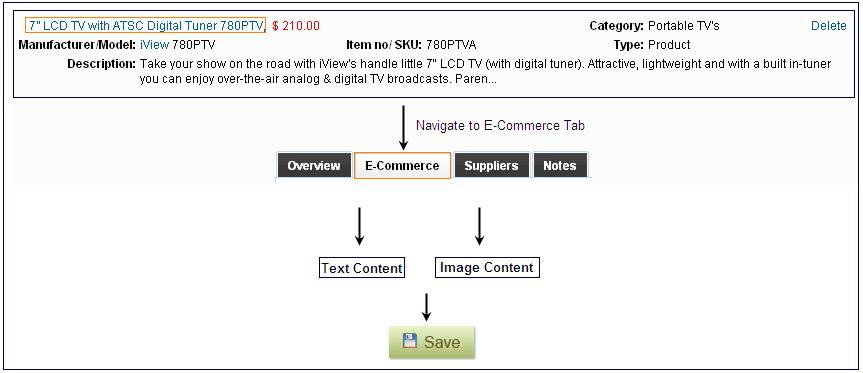
The products displayed on your website can be easily edited using the Product Management section. Typically each product has a different description and can be edited, but sometimes to make it easy for you a single product might contain all the product pages content. Please contact your account manager to find out if all your product page content is associated … Continue reading
How to optimize your site for Search Engines using Apptivo?

With any website, on-page optimization has alot to do with putting the right words in the right places. Apptivo helps optimize web pages for search engines in order to achieve a good position in their search results page with the following features: Add meta title, meta keywords and meta description to all your webpages Enter keyword phrases into the Meta … Continue reading
How do I view leads captured from my website?

When people contact you through web forms/ contact forms on your website they are captured as leads in the Apptivo. To view their information use the following steps: Login to Apptivo and navigate to Sales section -> click on Leads App You will see the Leads dashboard where you can view a list of all the leads from your website … Continue reading
Why don’t the accounts we created while testing the website work anymore?
When an Apptivo powered website is being developed, the website is hosted in a Beta environment meant for testing. In this stage we test the website internally and allow the website owners to preview the website. In this stage the website is not fully developed, as a result, any accounts you create might not be accurately stored in Apptivo. If … Continue reading
Authorize.net – Sign up for Customer Information Manager service to allow returning customers to use saved credit cards
Please follow these instructions to sign up for Customer Information Manager (CIM) service from Authorize.net Log-in to your Authorize.net account and navigate to Merchant Profile On the Merchant Profile page you will notice two sections. The second section will be titled Additional Services. Under Additional Services section, you can find CIM. You can sign up for this service by clicking … Continue reading
How can I allow returning customers to use their saved credit card on my website?

Apptivo provides strong integration with various payment gateways. Each gateway provides certain basic features to merchants for free and then charges them for some additional value added services. To allow returning customers to use their saved credit card information on your website, the payment gateway needs to save the credit card info on their side and allow us to access … Continue reading
How do I setup my authorize.net payment gateway to capture payments?

To setup your authorize.net payment gateway, you need to complete the following three steps: Create an authorize. net account through apptivo and then login. If you already have an account you can directly log in to authorize.net. Obtain the API login ID and key from authorize. net Enable authorize.net in Apptivo To obtain the API key follow these steps: Login … Continue reading


